
by Alec Scaresbrook
Although now superceded first by the Lumix DMC-LX5 and then the LX7, and since then the LX100, the features are so similar to the LX3 that I haven’t seen the need to upgrade from this older version. Having bought it to replace my relatively heavy and bulky SLR (a Nikon D80 plus 18-200mm zoom lens), which was inconvenient for carrying while cycling and walking, I am still delighted with this compact Panasonic Lumix DMC-LX3.
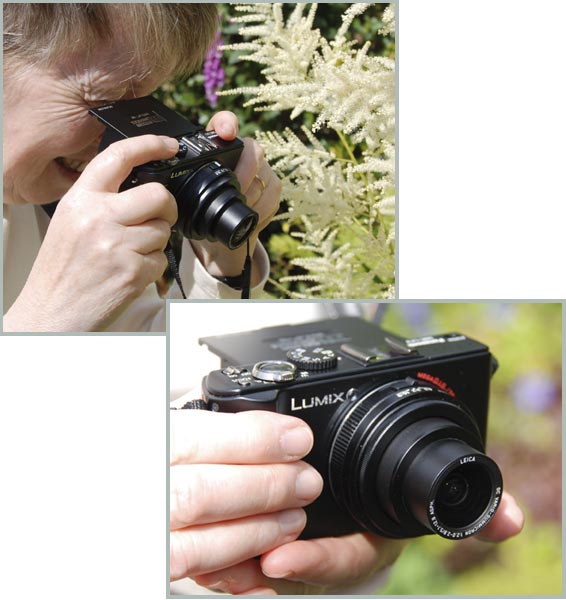
The camera is shown here being used with a fold-down Belkin light shade, which I later replaced with a Clearviewer (see section below on sunshades).
- – who’s the camera for?
- – what’s the camera useful for?
- – specification
- – use straight out of the box
- – one of my first pictures
Getting to grips with the complexity of the camera
- Image aspect ratios
- Operation modes
- Automatic modes
- Intelligent auto (iA)
- Exposure compensation
- Film types
- Picture quality
- Spoiled for choice
Introduction
My main criterion for a replacement camera was lens quality, and this Panasonic has a Leica lens (F2.0 -2.8 zoom), with a focal length (f) of 5.1-12.8mm, which in 35mm-film-camera terms equates to 24-60mm. This lens is ideal for me because I don’t have a use for extreme zoom.
I’ve found that the lens produces consistent image quality, and have yet to notice any major problems. There is a slight fish-eye effect in some shots on extreme wide angle but this is to be expected.
Who’s the camera for?
In my opinion, it’s a camera for all users, from the complete novice to the serious professional. It pretty much does everything you can think of and more compared with the Nikon D80.
What’s the camera useful for?
I use the DMC-LX3 for landscapes, street scenes, plants, flowers (close-ups) and general stuff. However, the electronics aren’t fast enough for action photography.
It’s a wide-angle camera with the option of making it even wider (to 18mm) with a wide-angle adapter (not included as standard, and I haven’t used it).
The optical zoom can be zoomed by 2.5 to achieve a focal length of 60mm. There is an extra zoom facility, but this only works when set up for images recorded in JPEG file format. It’s possible to zoom out by 17.5 with certain settings, but more about that later.
Specification
I haven’t included a specification here, as there’s already a very good online spec for the Lumix DMC-LX3 on Digital Photography Review). There’s a specification chart, pictures of the camera, and copious notes.
Use straight out of the box
The operating instructions state “Before use, please read these instructions completely” Well, the operating instruction manual covers many permutations of use, catering for all levels of photographic expertise, so it takes a long time to digest. Fortunately it’s possible to do a minimal amount of reading and take perfect pictures straight away. Just set the camera to iA (intelligent auto), choose an aspect ratio and a file size, then start shooting. You can’t go wrong.
One of my first pictures

Using iA (intelligent auto), the Panasonic Lumix DMC-LX3 worked out that the objective was a close-up shot of a flower, focused and set the colour temperature. Spooky or what? And the camera was hand held too. Image stabilization is excellent.
Getting to grips with the complexity of the Panasonic Lumix DMC-LX3
I must admit, I’m a bit of a control freak when it comes cameras, so it has taken me quite a while to get a handle on using it.
To be creative, I prefer to know exactly how the various automatic systems work because I dislike wondering if I can take a good picture or not. This is a hang-up from film camera days when I was never quite sure if the picture was right until the film was processed. I discovered early in my photographic career that knowing the limits of the kit leads to less work and waste, and above all more confidence and peace of mind. Digitals, of course, enable you to review what you’ve taken, but doing this uses a lot of power. I often travel light and don’t carry the battery charger, so being confident that the pics I’ve taken are spot-on all the time without reviewing them is a huge boon.
Image aspect ratios
You have a choice of four image aspect ratios i.e. 4:3, 3:2, 16:9 and 1:1 (the 1:1 aspect is a recent firmware update). You may ask ‘Why?’. Simply, some scenes look better in a particular aspect. The 1:1 aspect is good for portraiture, for example. Each aspect has a different picture size range. 4:3 will produce a maximum picture size of 10 megapixels for a RAW or JPEG (fine) image. The other image aspects have slightly smaller maximum picture sizes. The 1:1 aspect has a maximum of 7.5 megapixels. Does this matter? I don’t think so.
Operation modes
There are five automatic and two custom modes. Then there’s a manual and a video mode that I haven’t even touched yet. I’ll stick to the automatic modes for this feature.
The automatic modes include:
- Scenes (SCN) – sports, landscape, parties, food, fireworks etc
- Intelligent auto (iA) – automatic scene detection
- Program (P) – automatic exposure and focus
- Aperture priority (A) – automatic exposure and focus with aperture adjustment
- Speed priority (S) – automatic exposure and focus with shutter speed adjustment
Intelligent auto (iA)
Intelligent auto (iA) is the odd-one-out of the bunch. You can only produce JPEG (fine) images, and the choice of picture sizes depends on which aspect ratio is being used. The smaller the picture size, the greater the lens will zoom out, up to 4.5x with an aspect ratio of 4:3 and megapixels set to 0.3m. The recent addition of the 1:1 aspect ratio is not available for use in iA. Also, you can’t select the film type. iA just does everything for you.
Exposure compensation
This works in all automatic modes. You can ‘plus’ or ‘minus’ the exposure by up to 3 exposure values (EVs) using the little joy stick or the ‘up’ arrow key – you can see the change on the LCD screen.
Film types (for manual (M), P, A, S modes)
There are six colour film types (standard, dynamic, nature, smooth, vibrant, nostalgic) and three black and white (standard, dynamic, smooth), but these can only be set in some modes (i.e. P, A, S and manual). For each film type you can adjust contrast, sharpness, saturation and noise reduction. As you can see, film type is very complex. Fortunately, the camera has a help system explaining what each film type does. I haven’t delved into this part yet so I just use standard colour.
However, I have tried the vibrant film type and noticed that on a sunny day, reviewing the image to assess exposure can mislead you, as the image appears underexposed. This is because the brightness of the ambient light combined with the darker, more saturated colours of the vibrant film type make the LCD screen look a lot darker than when using the other film types.
Picture quality
You can choose from RAW and JPEGs (fine and standard) files. RAW always uses the maximum picture size for any aspect ratio you use. You can’t use the extra zoom (EZ) facility with REW selected. Nor can you use it with both RAW and JPEG selected.
Extra zoom is only available for JPEG files. How much EZ you get for any picture size and aspect ratio varies. For example, if you have the camera set to P with aspect set to 4:3, JPEG set to fine, picture size set to 10 megapixels, and intelligent ISO (iISO) switched on, you don’t get any EZ. You just get the same x2.5 zoom as if you were shooting using RAW. If you switch off Intelligent ISO (iISO), you then get EZ up to x10.. If you then change the picture size to 0.3 megapixels, you get EZ up to x17.9. All this varies according to which aspect ratio and picture size is used. I haven’t a clue what’s going on with Intelligent ISO (iISO), but you can set its limit.

A shot using EZ with the camera set to program mode and film quality set to JPEG fine.
Spoiled for choice
I’ve already mentioned a lot of options for this camera and on top of that it has three metering and six focusing modes. Don’t get me wrong here, I’m not criticising the complexity of the DMC-LX3 – of course it’s better to have the choices than not. The plus point is that you can go as far as you like when controlling the picture-making process with this camera.
My choices
RAW versus JPEG
I’ve now settled down to shooting only RAW files. When I switched from film to digital, I started shooting a combination of RAW and JPEG images. However, doing this presented an image management nightmare because I ended up with a folder containing two original images for one shot. The SD card capacity is reduced too. I find it much easier and less work to make other image files from RAW files as and when required.
General shooting
For general photography, I mainly use P (Program) mode, with the +/- exposure feature when required. I can’t see when I would use the manual mode because I don’t think I could improve on the automatic systems provided.
Custom setting
I’ve set-up a custom mode for 5 megapixel fine JPEG pictures, with Intelligent ISO (iISO) switched off, which enables extra zoom (EZ) to 14.3x when using an aspect ratio of 4.3. I’ve set the film to standard.
Pre-set scenes
I have the scene (SCN) mode set to sport, ready for shots that require a fast shutter speed. The landscape mode is useful too for setting the lens to infinity (maximum depth of field).
Built-in flash
I use this mainly for fill-in flash because you can only get full flash coverage for very close subjects. Fortunately, flash isn’t necessary to get a sharp image, or to light a scene. Even in the worst of lighting conditions, I’ve been able to take excellent hand-held shots by relying on the camera’s features of wide aperture and image stabilization.
 A tricky shot because it was indoors with artificial lighting. I set the camera to program mode. Hand-held at 1/10 of a second, f2 aperture, 800 ISO with exposure compensation at+1 EV. Later, I applied autolevels using PhotoShop to remove a very slight colour cast. It’s a bit grainy, but that’s only to be expected.
Miscellaneous
Lens conversion adapter and filter
I’ve fitted the DMC-LX3 with the optional lens adapter and a UV filter. The lens adapter is a metal tube that protects the zoom lens as well as allowing filters and the optional 18mm lens to be fitted. Also, the adapter allows for better holding of the camera. However, it does makes the DMC-LX3 more bulky. The only problem I’ve had with the adapter/filter combo is that if you get a rain drop or something else on the filter, then either the camera will focus on it instead, or the image will be seriously degraded.
Sunshade for LCD screen
LCD screens are a really naff idea on a sunny day so I’ve fitted a Delkin pop-up LCD sunshade (it folds flat, and helps protect the screen too – you can find them on Amazon). This, combined with wearing a wide brim sunhat means I can see the LCD screen image adequately in the brightest of light. However, Val doesn’t find this useful because she needs to hold the camera further away than I do to focus on the screen, so she just sees her reflection rather than the scene.
Update May 2013: I have just bought a ClearViewer viewfinder which was designed specifically for this camera by its owner, who then expanded the range to other makes and models. It is well made, and compact, folding down over the rear screen to pack away so it needn’t be removed each time. Instead of fitting to the hotshoe, it is attached at the tripod point. It is incredibly useful as I can see the screen for taking and reviewing images, even in bright sunlight. Fantastic add-on and worth every penny (well, cent, as it comes from the USA). No problems about ordering from the UK either – I paid using PayPal (you don’t even need a PayPal account to use this facility either) – and it was shipped promptly.
Wet/cold conditions
I don’t think this is a camera to take out in the rain or the damp, but come to think about it, neither was the Nikon D80. I imagine all these digital cameras will fail when temperatures go to zero and below, because of battery susceptibility to the cold.
A protective camera case
I wanted a case for ease of access and to store bits and pieces (filter, spare SD cards, battery). As I have fitted the camera with the extension tube and a filter that I leave on permanently, I needed a slightly bigger case than usual, so chose the Lowe Pro Apex 60AW. This case has a neck strap and an integral waterproof cover, a zip-round top-loading main compartment and a divider with a pocket for secure storage of spare cards, plus a mesh pocket (not so secure, so I don’t use it – it’s too easy for things to be dislodged/fall out).
Because of the bulky extension tube, there isn’t much space to put anything very thick in the integral pocket. However, I was able to modify the bag by sewing in an extra pocket to store another filter in a protective case – stitching the pocket to the divider meant that I could fix the exact position of the filter case (beneath the integral secure pocket) so the bag is still easy to zip up.
I store a spare battery in a box in the base of the bag too. For security, I glued a piece of Velcro to the box, so it clings to the bag lining.
My verdict
On the whole I’m very pleased with the Panasonic Lumix DMC-LX3, and because of its convenience and compactness, I’m taking far more pictures than when I had the Nikon D80. It really is a remarkable bit of kit, with big and bright LCD menus for easy of reading.
I just wish it operated a little faster, but I can live with this. It switches on and focuses fast enough, but the slight time lag between pressing the shutter button and the camera taking the picture has taken me some time to get used to. Also, with the power save feature switched on, you lose a few valuable seconds reviving the camera once it’s powered down. You have to press the shutter button once to wake the camera up, and then a second time to remove the displayed message (‘Save feature switched on’) before you are good to go.
The only feature that I miss is the option of a wireless shutter release, so I have to use the self-timer instead.
Where to buy?
Find the latest version, the LX100 on sale at Jessops, amongst others. You may find older second-hand models on sale via eBay, Gumtree and Amazon.